Sous Vide Duck Breast with Caramelized Apples and Rosemary

Posted on November 7, 2017

Finally Fall

Fall is finally here! For those of us in New York City, it may have arrived a month or so late, but I’m not complaining. I love the crisp fall weather, and the warm cozy sweaters that come with it. In spite of my insatiable pregnancy craving for apples, I wasn’t up to apple picking this year – a major disappointment for me. However, I lucked out by having friends and co-workers who kindly shared their extras with me! I was actually shocked by how many people were happy to pass along their hard won produce, and more surprised by the reasons why. The aspect I love most about apple picking, seemed to flummox most of my friends. That is – what to do with the apples.

Using the Apples

The apples we are used to seeing in our grocery stores are very different from the ones you pick. Many of the apples in local orchards are varieties that are unfamiliar to most of us, and a good portion of them are more tart than sweet. Not only that, but there is a huge bias towards “pretty produce”, and as a result some very tasty apples get discarded without a single bite! The more experienced culinary friends I have knew what they were going to cook, and picked apples accordingly. However, a fair number of people just went for the fun, and were taken aback when they bit into their beautiful orchard apple, and didn’t experience the sweetness they were expecting.

If you enjoy cooking, an abundance of tart apples is a blessing! Apple sauce, apple butter, and apple pie are all great ways to use your haul. As much as I do love baking, I prefer to use fruit in my savory dishes. One of my favorite fall go-to dishes is a pork chop smothered in apples, onions and thyme. This dish epitomizes fall for me, and is a great crowd pleaser for dinner parties. However, I wanted to try something a bit different this year, and really honor the apples with a truly local and seasonal dish. Duck!

Why Duck

During the first few months of my pregnancy, I couldn’t even keep water down. It was not a fun time, and I ended up losing over 15 pounds. Scary when you think about the nutrients you are supposed to be supplying your growing baby! Luckily, the nausea mostly passed once I hit the second trimester. Slowly I have started to gain back some of the weight I lost. However, I want to make sure that what I’m eating has the most nutritional “bang for my buck”. I still can’t keep down red meat easily, so I’ve been researching what other proteins offer some of the same benefits in good fat, iron, and nutrients. I was shocked to learn that one of my best choices was duck!

After some research, I found that duck a great source of nutrients. Although it is a very fatty protein, duck high in the “good fat” (monounsaturated fat, or MUFA), and low in the bad fat (polyunsaturated, or PUFA). In fact, duck is higher in MUFA and lower in PUFA than both chicken and turkey! Additionally, duck has zero carbs (for comparison, chicken has 15g per serving). Though not as good as red meat, duck is certainly the leader in healthy fat when it comes to poultry.

The nutrient and mineral profile of duck is also far superior to chicken. A serving of duck has 25% of your RDI of iron and 24% your RDI for zinc. This is relative to the 6% and 7% found in chicken. It also has twice the amount of folate found in chicken, three times the amount of B12 and a whopping sixteen times the amount of B6!

Pulling it all together

Once I decided on the key ingredients, I needed to figure out what I wanted to make. As much as I do love duck, I am still mastering the art of rendering down all of the fat to get a nice crisp skin and not overcooking the protein. I hadn’t tried using yet with duck breast, and thought this would be a good opportunity.

Sous Vide the Duck

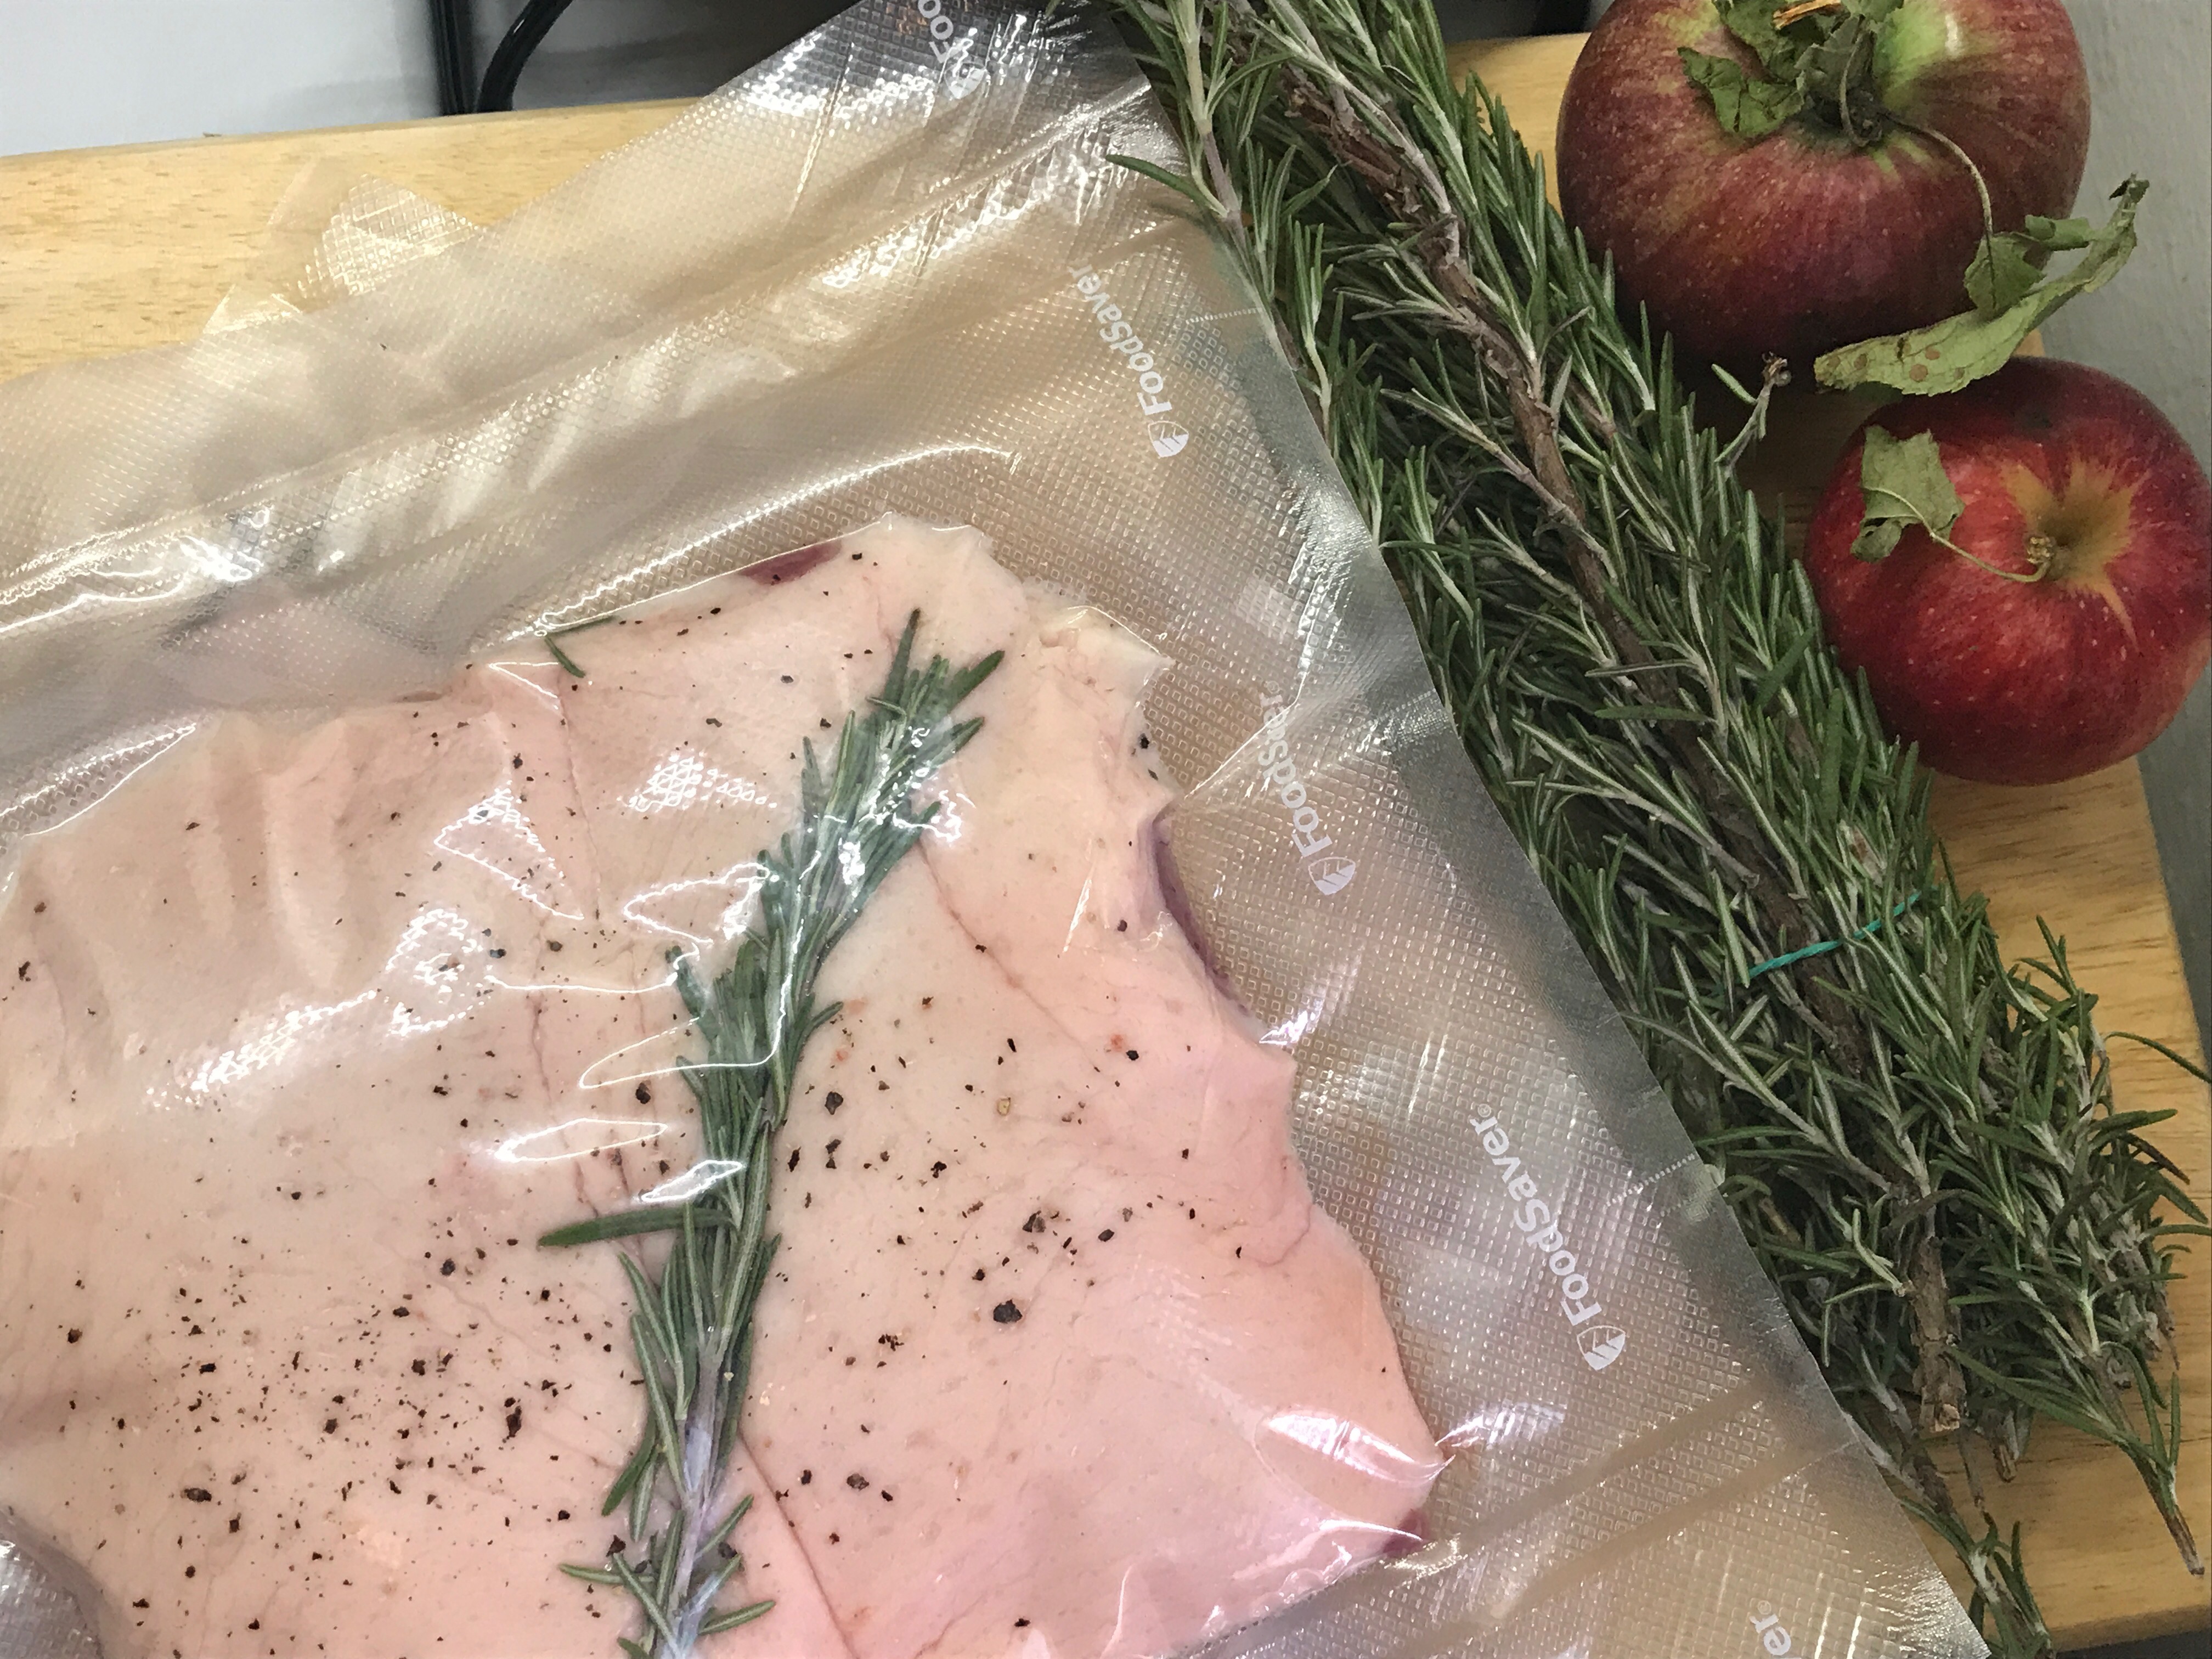
After seasoning the duck breasts with salt and pepper, I sealed them in bags with sprigs of fresh rosemary. I use a  to do this, but you can also use the water immersion technique to seal regular plastic bags (as long as they are BPA free). I set the water for 135 degrees F., and let them cook. The duck will be ready after 1 hour in the sous vide, but can stay in for up to 4 (I kept them in for 1.5 hours).

Caramelize the Apples

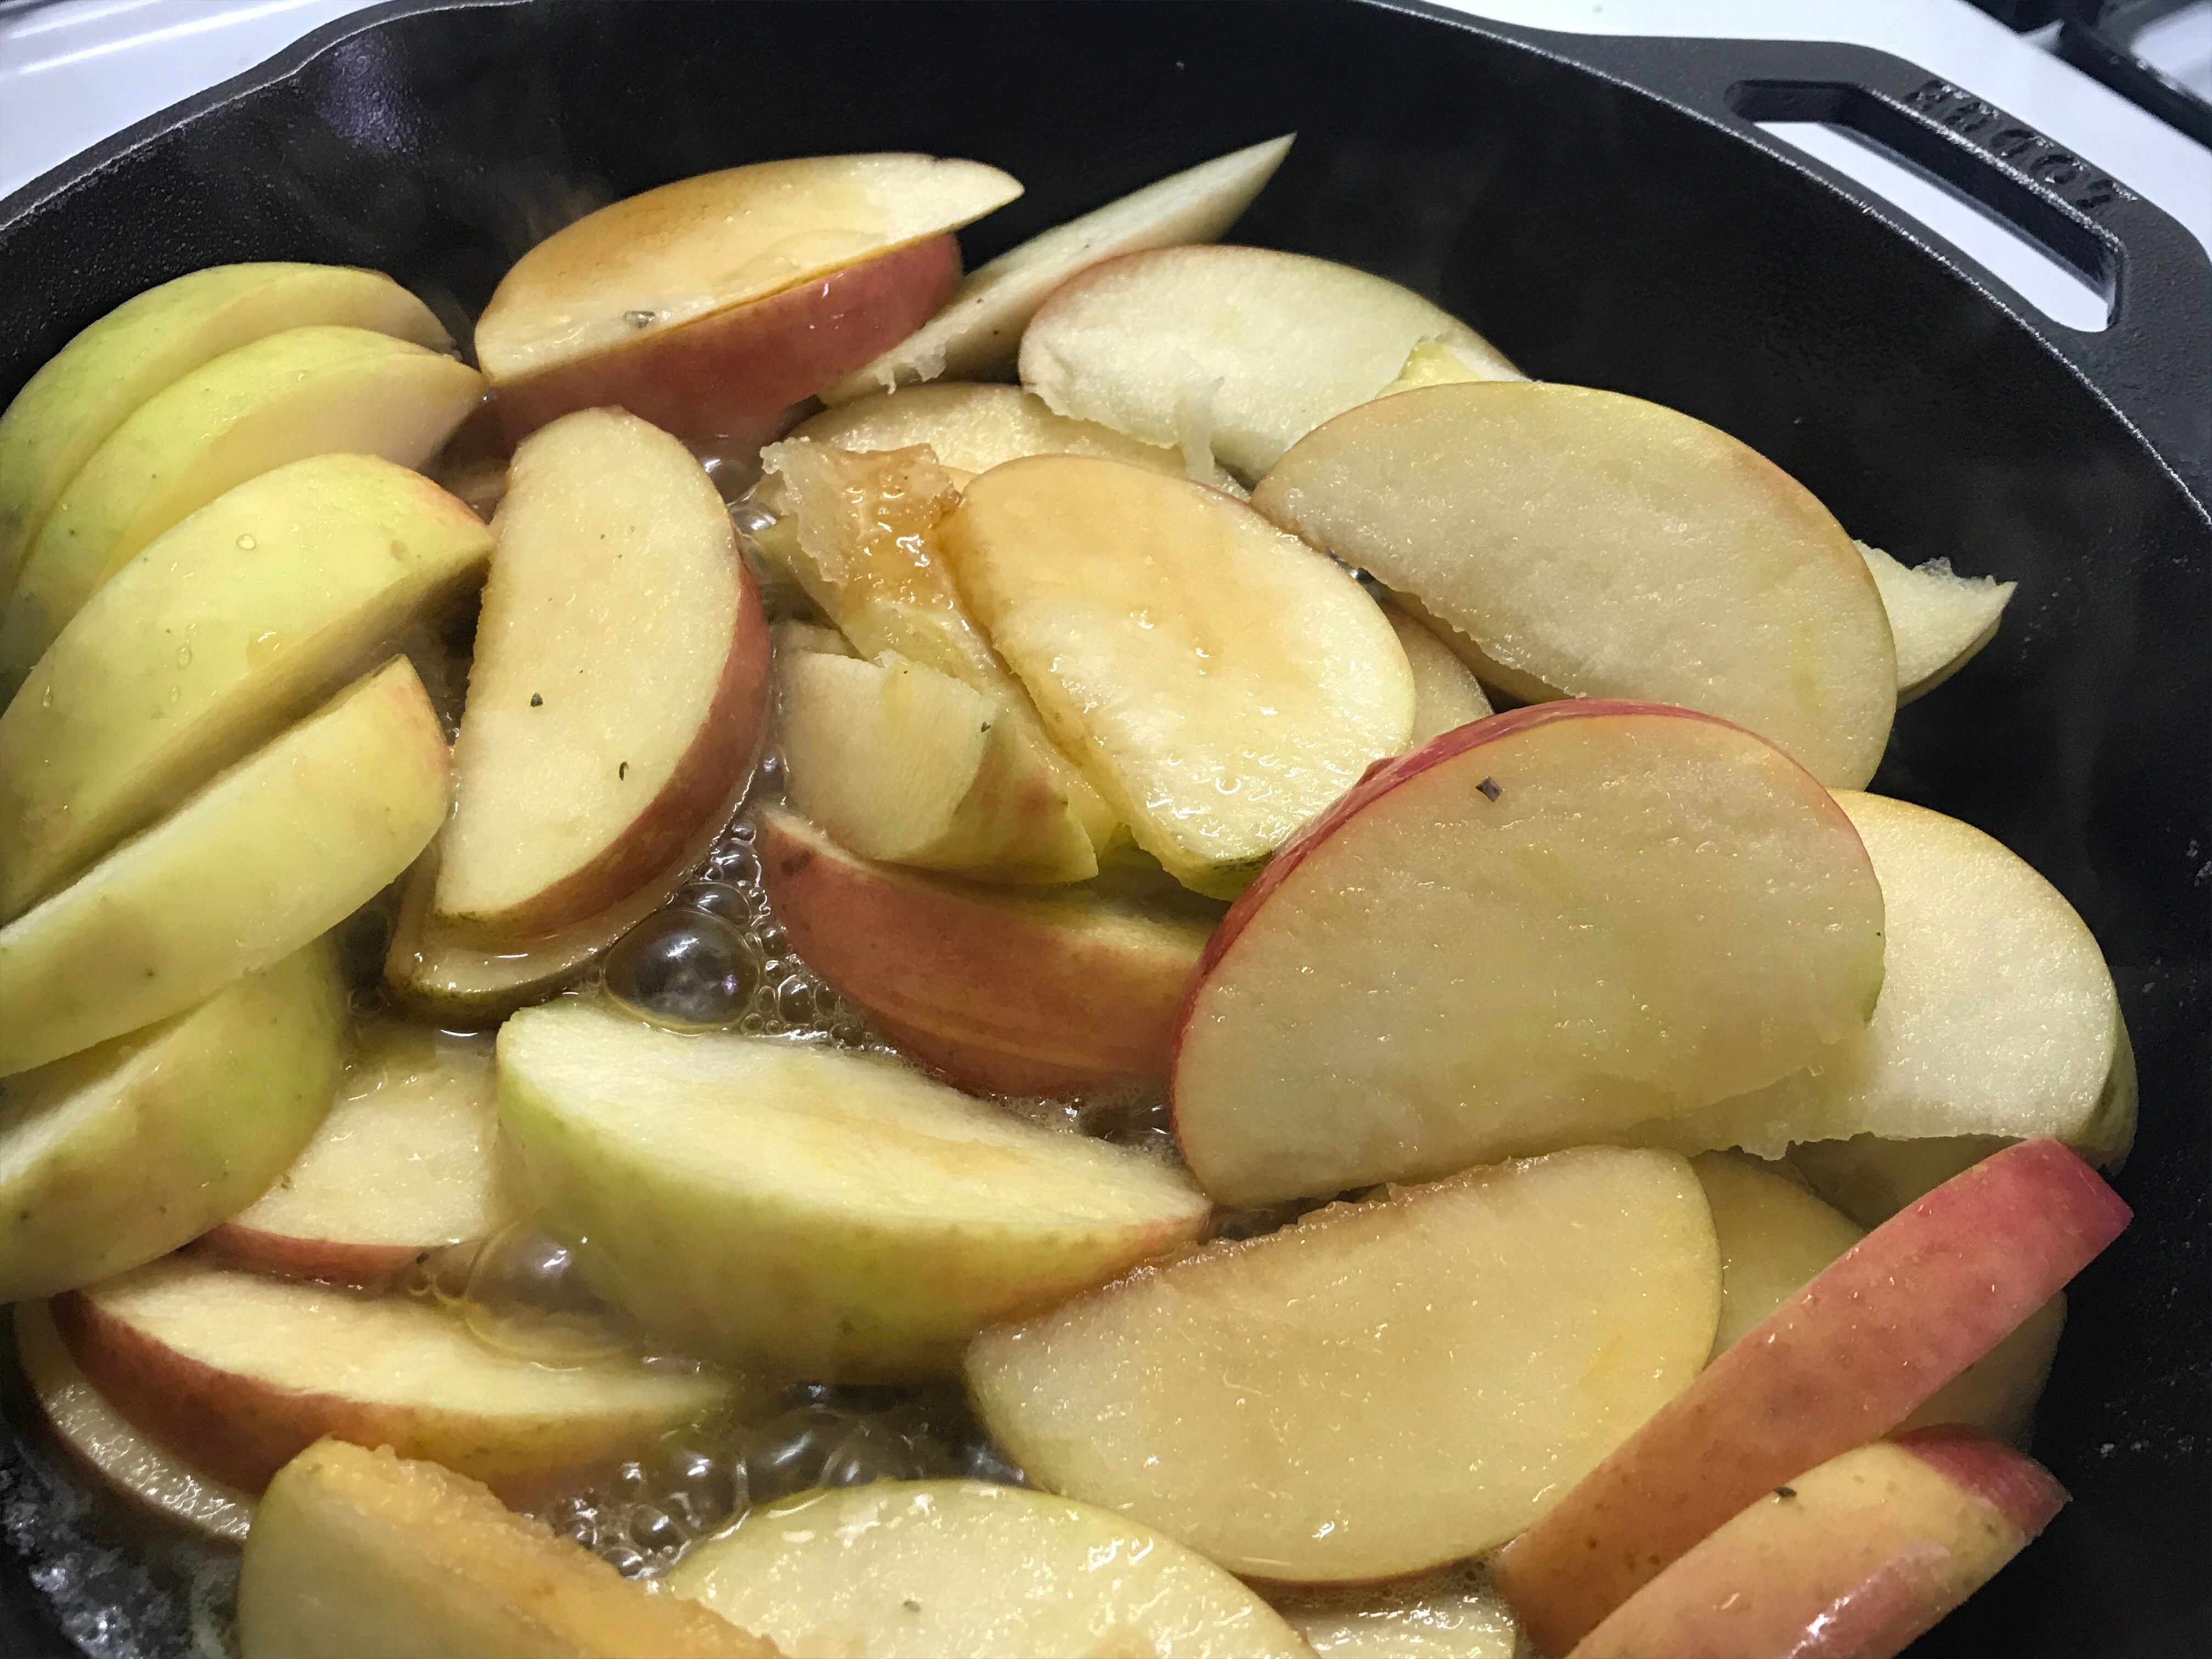
Once the duck was done, I took it out of the water bath and set it aside to cool slightly. While the duck rested (still in the bag), I started on the apples. In a large cast iron skillet over medium heat, I melted grass fed butter. Once it had melted (but wasn’t sizzling), I added in the apples and maple syrup. I let the apples cook for about 5-7 minutes until they were browned, and then flipped them over with tongs. I let them sit for another 5 minutes until they were nice and caramelized. Note: it will take longer for maple syrup to caramelize the apples than sugar would, so be patient. I added in lemon juice to the pan, and gave the apples a good stir, scraping caramelized bits up from the pan before removing from the heat.

Finishing the Duck

At this point I set the apples aside into a serving dish, and replaced the pan over the burner on medium-low heat. Fat side down, I placed the duck breast into the pan. I let the duck breasts cook for 10-15 minutes, rendering down as much fat as I could and getting the skin crispy. Removing the duck from the pan, I added it to the dish with the apples.

The pan was now filled with a nice amount of duck fat (or “liquid gold” as we call it in my house). I drained off all but about 2 tbsp of the fat into a freezer safe container, and set it aside to cool. Once this reached room temperature, I covered it and put it in the freezer for future use.

Finishing touches

Returning the pan to medium heat, I added in the shallots and let them cook (stirring occasionally) until they were soft, but not burned. Still stirring, I then added in about 1 sprig of rosemary (off the stem), and chicken stock. Once this started to simmer, I added in the vinegar, and some salt and pepper. I gave this about one more minute over heat (while stirring), before pouring the contents of the pan all over the duck and apples in the serving dish.

Serving suggestions

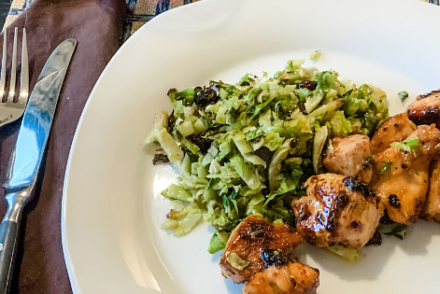
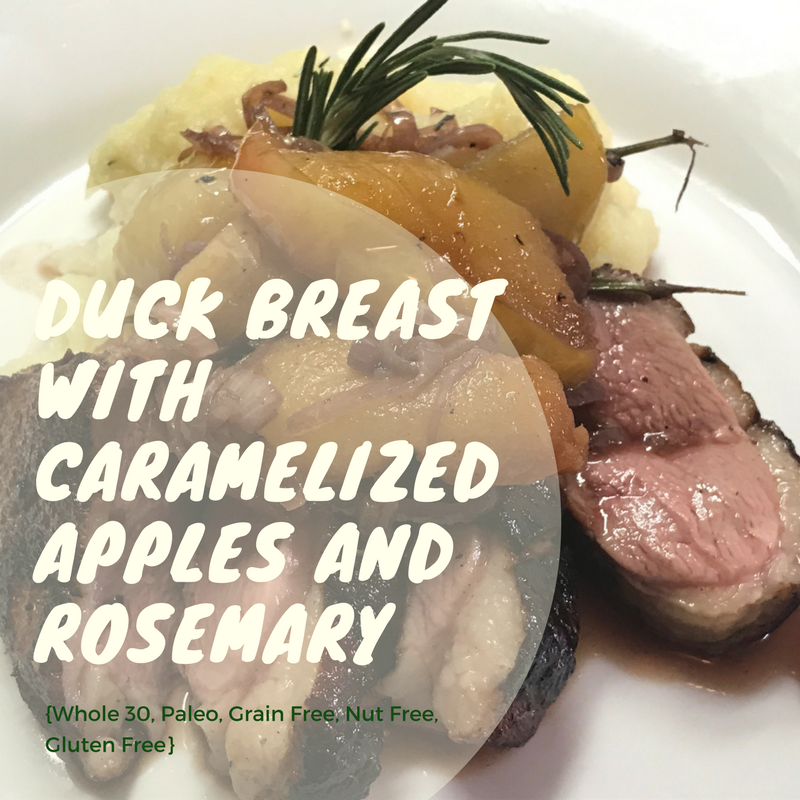
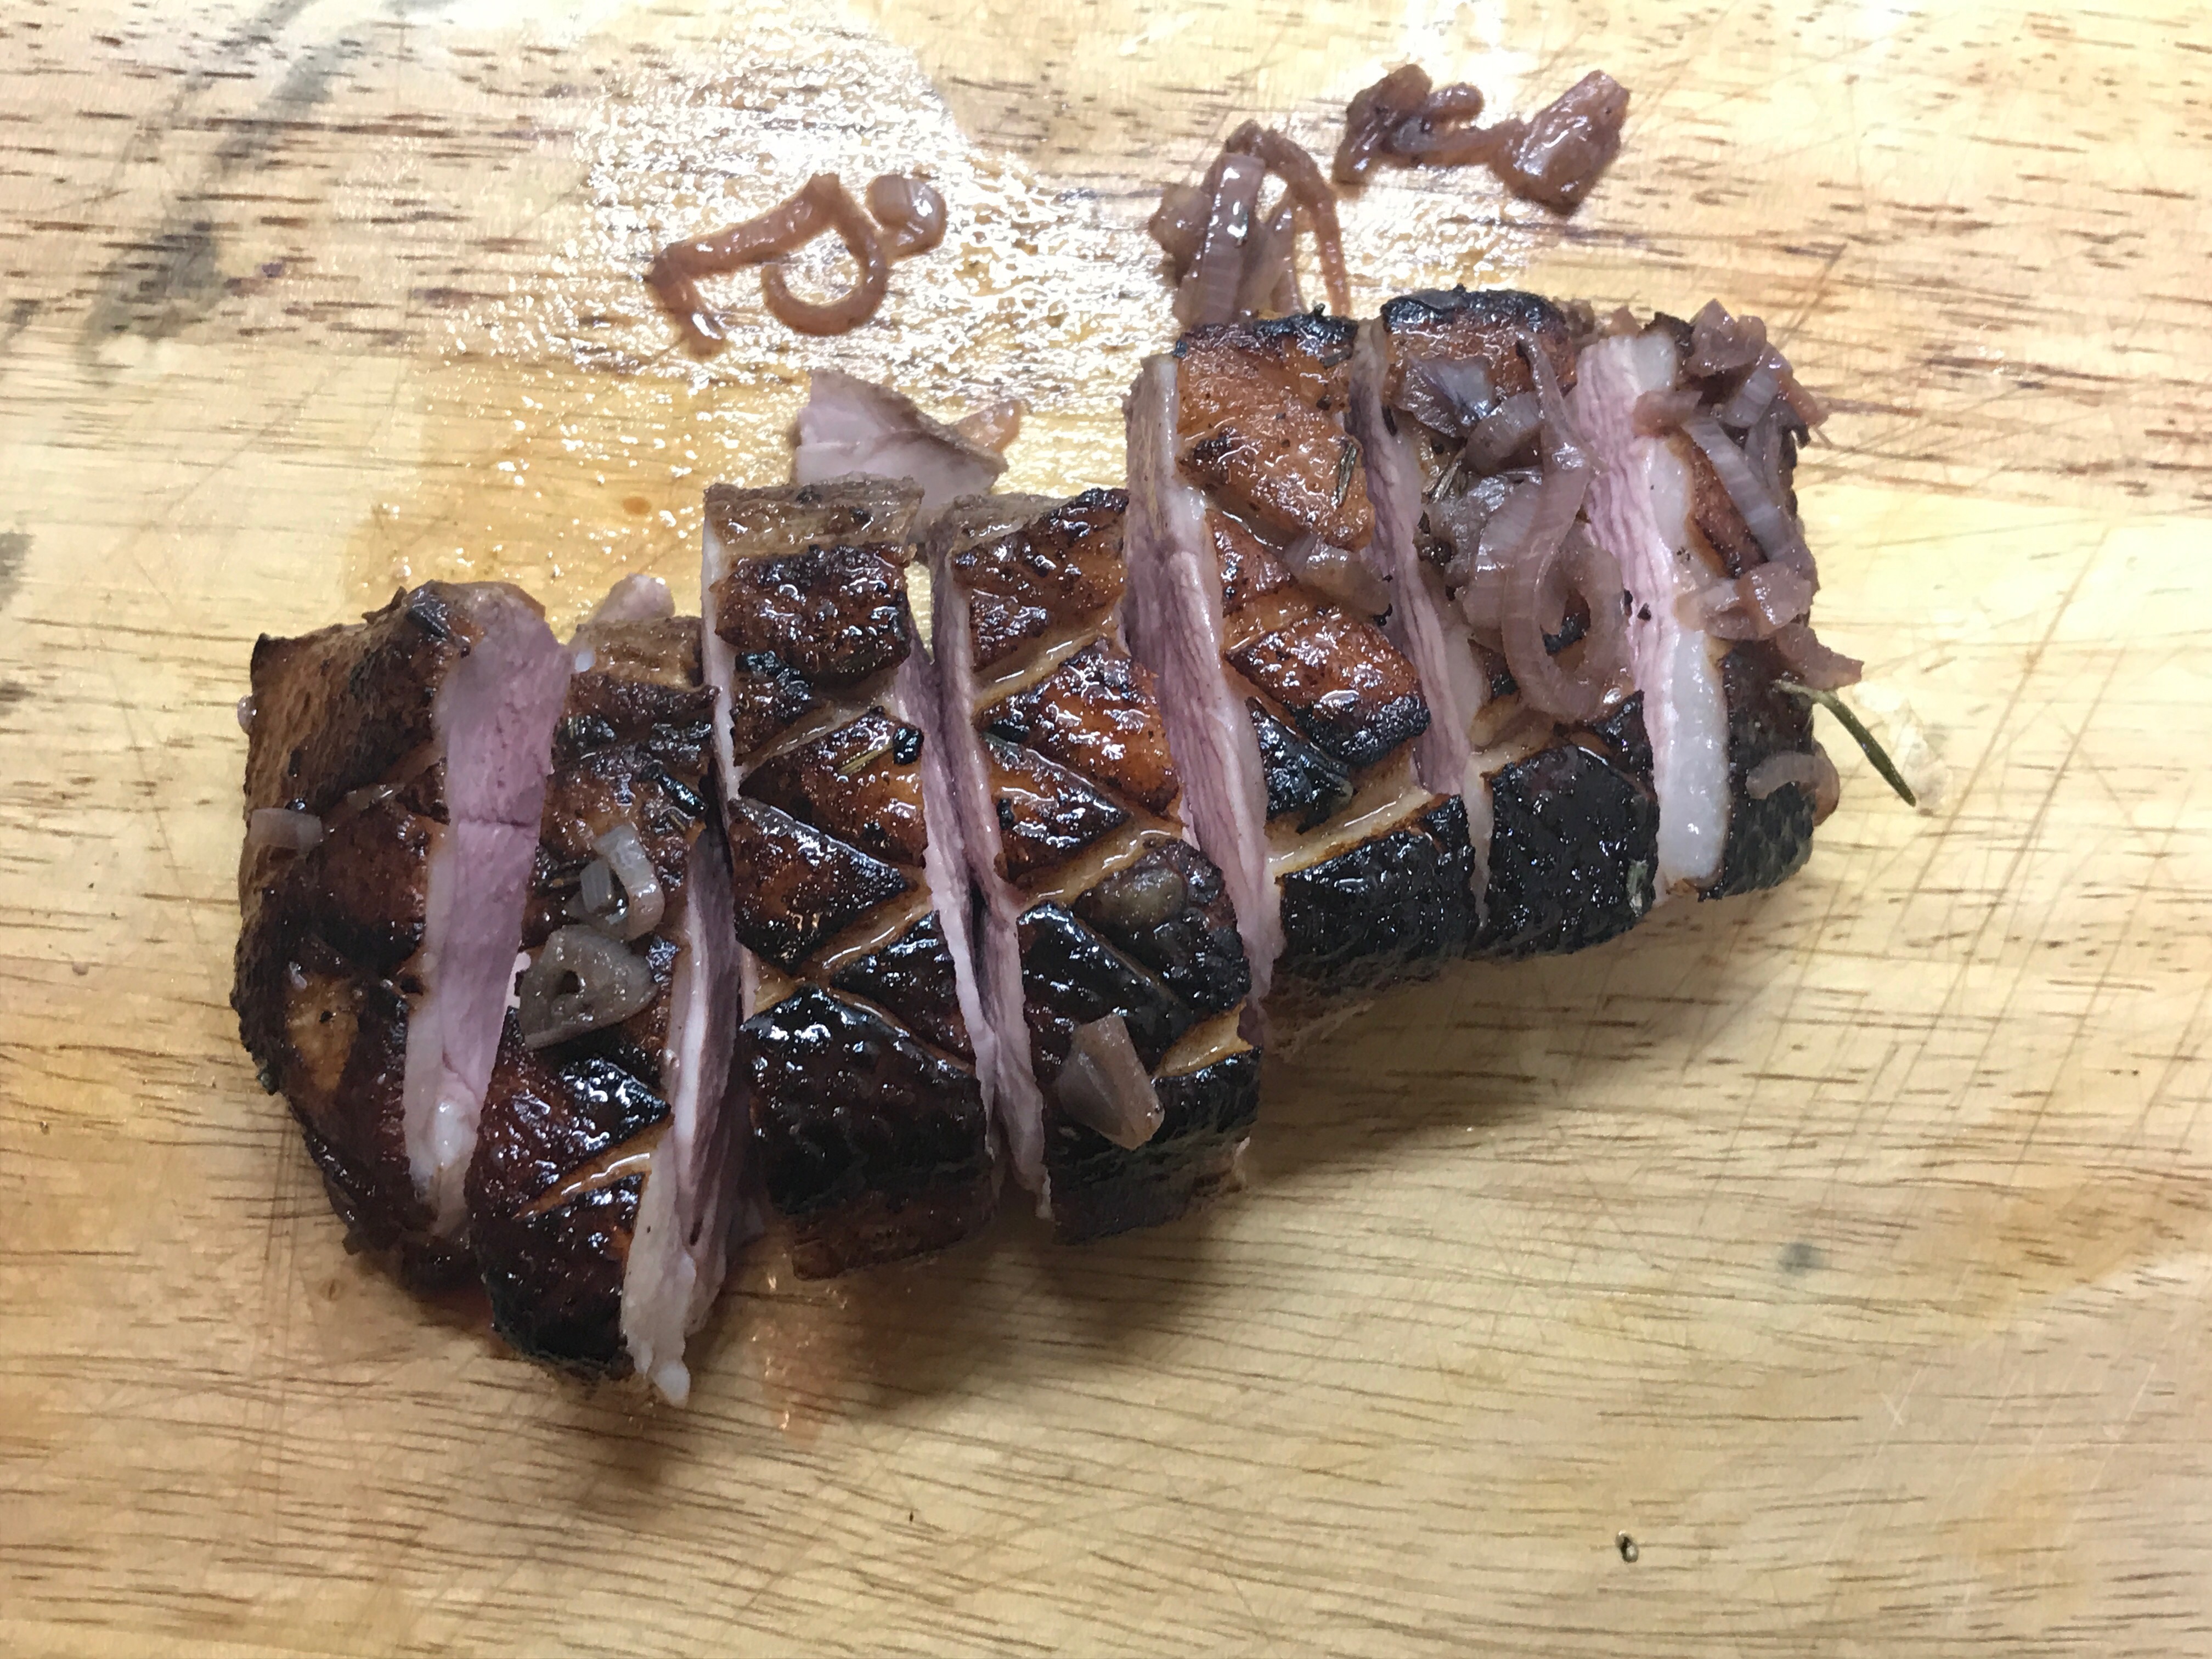
The duck breasts I got were huge, and far larger than a single serving. To make this a bit easier to serve, I actually sliced the duck ahead of time, and plated the dish for everyone. I served the duck on top of a parsnip and cauliflower puree, and topped it with the apples, shallots and sauce. For a little bit of flair, I garnished it with some fresh rosemary sprigs.

This dish was a HUGE success – and also made amazing leftovers. I added duck over salad for lunch the next day, and even had the duck and apples fill an omelet for breakfast. I will be making this dish again very soon.


Sous Vide Duck Breast with Caramelized Apples and Rosemary

Sous Vide Duck Breast with Caramelized Apples and Rosemary

Ingredients

  • 2 tablespoons unsalted butter, ghee or coconut oil
  • 2 tablespoons maple syrup
  • 2 cooking apples, cored and cut in 1/4-inch-thick slices
  • 2 tablespoons lemon juice
  • 2 Moulard duck “magret” half-breasts (each about 1 pound)
  • Salt and pepper, to taste
  • 2 shallots, finely chopped
  • 1/2 cup chicken stock or bone broth
  • ½ teaspoon apple cider vinegar
  • 3 sprigs fresh rosemary

Instructions

  1. Set Sous Vide to 135 degrees R.
  2. Salt and pepper the duck breasts, and vacuum seal in bags with 1 sprig of rosemary each. Cook for 1-4 hours.
  3. Remove duck breasts from water bath, and set aside to cool.
  4. In large cast iron skillet, heat the 2 tbsp butter (or fat of choice) over medium heat. When butter has melted, but is not bubbling, add in the apples. Cook the apples on each side for 5-7 minutes, or until caramelized. Stir in the lemon juice and remove from heat. Set apples aside in serving dish.
  5. Remove the duck from the sealed bags, and scour the fat side of the breast to make hatch marks. Season again with salt and pepper.
  6. Return the pan to the burner, and lower to medium-low heat. Place duck and the two rosemary sprigs into the pan, fat side down. Cook for 10-15 minutes, or until the fat has rendered and the skin is nice and crispy brown.
  7. Remove the duck from the pan, and set it aside in the serving dish with the apples. Strain off all but about 2 tbsp of duck fat. Reserve and freeze the excess fat for later.
  8. Raise the heat back up to medium, and add the shallots into the pan to cook in the remaining fat. Stir shallots occasionally.
  9. Once shallots are softened, add in the last sprig of rosemary (off the stem), and the chicken broth. Keep stirring, and allow the broth to simmer for about 2 minutes before adding in the apple cider vinegar. Add a little salt and pepper, and remove from heat.
  10. Pour shallot sauce over the duck and apples in the serving dish. Can be served in the one dish for self- serve, or plated individually.

Notes

I recommend serving this over a cauliflower and parsnip puree.

Schema/Recipe SEO Data Markup by Yummly Rich Recipes
https://www.urbancavewoman.com/recipes/entrees/sous-vide-duck-breast-caramelized-apples/

Butternut Squash Lasagna {Keto, Low Carb, Gluten Free}

Posted on November 5, 2017

Growing a human is hard work! Though I’m craving homemade and hearty meals, finding the energy to pull something together has been difficult. Luckily, today was daylight saving time, and the extra hour of sleep left me feeling refreshed and energetic for the first time in five months! I decided to take advantage of the extra hour, and surge in energy, by finally trying out a recipe I’ve been playing around with in my head for a while – Butternut Squash Lasagna. This is the ultimate in fall comfort food. Warm, filling, flavorful, and great as leftovers! Unlike most of my recipes, this is not paleo since it uses dairy. However, it is still low carb, gluten free, and packed full of veggies and clean ingredients.

Making the “Noodles”

As much as I love cooking, I really shouldn’t be left alone with sharp objects. After a nasty accident a few years ago, I’ve become very cautious with my fingers in the kitchen. As a result, I tend to be a bit wary of using a mandolin for food prep, however if you have much better hand-eye coordination than I do, a mandolin or even a very good knife can be used to make the noodles. In my case, I took the easy way out, and used my for my Kitchenaid Stand mixer. While it may be a bit pricey, it has become one of my new favorite kitchen gadgets! And saving my fingers from more stitches is totally worth it.

Whether using the sheet cutter attachment, , or a knife, cut the butternut squash into long flat “noodles”. My “noodles” were about about 2 1/2 – 3″ wide and 11″ long, but cut yours to the length of your baking dish. I used 12 of the noodles to make my lasagna.

Making the Filling

Since finding out I was pregnant, I’ve been able to integrate some dairy back into my diet. While I know I’m normally able to get calcium from other foods, pregnancy has made keeping some of those foods down a challenge. In order to make sure I’m getting all the nutrients the baby and I need, I’ve made adaptations and added back in some food groups. That being said, I’m still very choosy about the ingredients I use; particularly when it comes to my dairy and meat.

For the cheese ingredients, I was lucky enough to find homemade goat cheese ricotta, and organic part skim shredded mozzarella. I also chose a high quality grated parmesan, but couldn’t find one that was organic. While I’ve seen other butternut squash recipes on the internet use various types of meat, I chose to use a grass fed chorizo. I love how the spiciness of the sausage meat balances out the sweetness of the butternut squash.

Normally, I would use a homemade marinara sauce, but I really didn’t have the energy to do that. Instead, I used a homemade, all natural sauce from one of my local markets. The ingredients were all natural, and basically what I would put in my own sauce (tomatoes, tomato paste, lemon juice, basil, garlic, thyme, salt and pepper). If you have the time or energy, homemade is always best, but I’m happy to take a shortcut these days when it doesn’t compromise quality. 

Putting it all Together

Assembling the lasagna was fun and easy. I actually did it in the morning and stored it (covered) in the fridge until I was ready to cook dinner. This could be assembled and kept in the fridge for up to one day. In a 9 x 11″ casserole, I layered the meat and tomato sauce first, followed by laying three noodle sheets in the dish (this covered the entire bottom surface of my dish). Next, I spread dollops of the ricotta mixture on top of the “noodles”. The mixture doesn’t spread easily, so it will be fairly clumpy. Don’t worry, it will mix well once baked. On top of the ricotta, I sprinkled a layer of the shredded mozzarella, and then another layer of the meat sauce, and topped this off again with three squash noodles. I repeated the layering until i ran out of my noodles. On top of this final layer, I spread sauce, and reserved a small amount of ricotta and mozzarella for later.

At this point, I covered the dish, and put the lasagna in the fridge. However, if you are making this to eat immediately, you can put it directly in the oven and start baking. Cook time will take 60 minutes, stopping after 30 minutes to uncover the lasagna, and sprinkle with the remaining cheese. Warning, while cooking – this will smell AMAZING. My poor dog sat whining by the kitchen door for an hour hoping I was cooking for her. She still hasn’t forgiven me.


The Finished Product

This was one of the best meals I’ve made in a long time. I honestly couldn’t tell that I didn’t use actual noodles! The lasagna came out perfectly. Warm, filling, flavorful, and with a crunchy cheesy top layer. It was the perfect meal on a nice crisp fall evening. Even better, I have enough leftovers to take to work for lunch all week! This is going to become a regular dish in my fall meal rotation.

Butternut Squash Lasagna {Keto, Low Carb, Gluten Free}

Butternut Squash Lasagna {Keto, Low Carb, Gluten Free}

Ingredients

  • 12 Butternut Squash Noodles
  • 16 oz marinara sauce
  • 4 chorizo sausages, de-cased (or 16 oz chorizo)
  • 2/3 cup goats milk ricotta
  • 1 1/2 cups shredded mozzarella
  • 1/2 cup grated parmesan
  • 2 tbsp fresh chopped sage
  • 1 egg
  • 1 tbsp chopped garlic
  • salt & pepper
  • 1 tsp olive oil

Instructions

  1. Make the butternut squash noodles. Noodles should be 2 1/2 - 3" wide, and run the length of your casserole dish.
  2. Place a large saucepan over medium heat, and drizzle in the olive oil. Saute the chorizo in the olive oil until it is browned. Add in the garlic, and cook for 5 more minutes, stirring occasionally.
  3. Reduce heat to low, and add in the marinara sauce. Cover, and let simmer for 15 minutes.
  4. While the sauce is simmering, combine the ricotta, parmesan, egg and 1 tbsp of the sage in a medium mixing bowl. Mix together until a creamy paste is produced. Add in salt and pepper (I did a pinch of each).
  5. When the meat sauce has cooked, remove from heat, and start to assemble the lasagna. In a 9 x 11 casserole dish, spoon in a thin layer of the meat sauce. Top with three of the noodles, to cover the bottom of the dish.
  6. Dollop 1/4 of the ricotta mixture on top of the noodles,don't worry if it won't spread smoothly. Cover in 1/4 of the mozzarella, and then layer on more of the meat sauce before laying down another layer of noodles.
  7. Repeat until you lay down your last layer of noodles. Spoon the remainder of the meat sauce on top. Set aside the remaining 1/4 of the ricotta mixture, 1/4 of the shredded mozzarella, and 1 tbsp of sage. These will be layered on later. At this point, you can either cover the lasagna and refrigerate for up to one day, or cook immediately.
  8. Pre-heat oven to 375 degrees. Place the covered casserole dish in the oven for 30 minutes to bake.
  9. After 30 minutes, remove the lasagna from the oven, and uncover. Dollop with the remaining ricotta, and cover with the last of the mozzarella. Sprinkle on the last of the sage, and put back in the oven for another 30 minutes.
  10. Remove from oven, and let sit for 5 minutes before cutting and serving. Enjoy!

Notes

Refrigerate or freeze remaining portions for later!

Schema/Recipe SEO Data Markup by Yummly Rich Recipes
https://www.urbancavewoman.com/recipes/entrees/butternut-squash-lasagna/


Instant Pot Bone Broth

Posted on May 10, 2017

A while back I wrote my review of the Instant Pot. This magical device has truly transformed my cooking behavior, and I fall in love with it more and more each week. I especially love that it allows me to make bone broth in a fraction of the time. Instant Pot bone broth is always in our fridge, and stocked in our freezer. It is great to add to recipes in place of regular broth, and tastes delicious on it’s own or as a base for any soup. Treating your body well, and giving it nutrients it needs to stay healthy has NEVER been so easy and enjoyable.

Why Bone Broth?

The healing powers of Chicken Soup have long been extolled by every grandmother on earth. The soothing broth and aromatic steam always seems to loosen my congestion and soothe a sore throat. Studies done over the past 20 years have actually shown that chicken and vegetable soup can reduce upper respiratory cold symptoms, and boost the immune system! 

Bone broth is a super charged version of traditional soup (though research is limited). The goal is to extract not just the flavor from bones and ligaments, but also the incredibly dense nutrients found in those ingredients. Bones are packed with nutrients like collagen, magnesium, calcium, and a host of other minerals. Getting those nutrients isn’t always easy though, as most of us won’t be gnawing on marrow bones regularly. The theory behind bone broth, is that you extract the spectrum of nutrients from the bones into a more easily digestible medium, broth. A cup a day of bone broth is supposed to:

  • Boost your immune system;
  • Protect joints;
  • Strengthen hair and nails;
  • Promote youthful and more radiant skin;
  • Promote gut health;
  • Improve metabolism; and
  • Assist in detox. 

I can’t speak to some of the super-healing properties everyone raves about. Since I already take collagen powder as part of my butter coffee each morning, the results may not be as pronounced for me. What I have noticed, is that drinking bone broth when sick makes me feel better, faster.

The Bones

When I first started making bone broth, I could only find recipes that called for grass fed marrow or soup bones. While I’m sure that these bones will produce a Michelin star worthy broth, they are a bit too pricey for me to use regularly. I also have a serious aversion to the flavor of beef broth (it just tastes like greasy water to me). For my broth, I wanted to build off of one of my favorite comfort foods – chicken soup. We roast a bird (chicken or duck typically) for dinner at least once a week. I simply freeze the carcass once I’ve removed most of the meat (leave some scraps on the bones), along with the neck and any giblets that may have come with the bird. This way I have an endless supply of bones ready for broth at a moment’s notice.

Once you have a good supply of bones, you need to roast them. Some recipes say you can skip this step, but you would be doing yourself a major disservice if you did. The flavor from the roasted bones is much richer, and the broth will take on a beautiful deep color. I will typically take the bones and lay them flat in a roasting pan for about 45 minutes at 450 degrees. You want the bones browned, but not burned, so just check on them about every 15 minutes until they get to the perfect point.

The Greens

All of the research done on the healing properties of soup highlighted that the effects of chicken soup were most pronounced when it included a variety of vegetables. Parsnips, carrots, onions, pepper and celery are all key to the success of your broth. Since I really want my broth to not only be flavorful, but healing, I also added in turmeric, ginger, garlic, and some aromatic herbs. 

I chose herbs that are known for flavor and health benefits. Parsley is not just an annoying garnish, but also packs a punch of B & C vitamins, folic acid, and various other nutrients. It is often used as a diuretic, and has been shown helpful in increasing heart, joint, bone and gut health. There is even some evidence that parsley can help in the treatment of diabetes, and is a natural cancer preventative. The next herb I used was dill. Chicken and dill is a classic combination. However, the dill isn’t just there for flavor – it has a job to do as well! Dill has antimicrobial properties, and is also useful for digestive health and lowering cholesterol. 

The final herb in my “witches brew” is thyme. Thyme is highly underrated as a natural healer, and has been shown to prevent food poisoning. It will not only prevent contamination in food, but decontaminate already tainted produce. A bit of thyme essential oil and water is a great natural way of cleaning your produce, but it has a lot of other great benefits as well. Thyme is fantastic if you are susceptible to respiratory infections. It is used as a natural cure for bronchitis, and can help ease the pains from a sore throat. Finally, it is also used as a natural remedy for high blood pressure and to reduce cholesterol. 

 The Process

A traditional bone broth will call for hours of simmering to extract the nutrients into the broth. This isn’t a project for a rainy afternoon, but can take 24-48 hours of simmering. The thought of leaving an open flame unattended for 48 hours gives me anxiety, so I was never going to make bone broth the traditional way. Enter the Instant Pot. 

While you can make a truly yummy broth in as little as 2 hours using the Instant Pot, I highly recommend letting this go overnight. I discovered this by accident one evening, when I fell asleep waiting for my broth to finish. When I woke up the next morning, I felt like Rumpelstiltskin had paid me a visit overnight, and turned my broth into liquid gold. It is hard to describe broth as creamy, but this truly was almost velvety to drink. The Instant Pot kept the broth in a controlled and sealed environment while I slept, and clearly magic had occurred. I am sure there is a scientific reason for it, but I’m just going to keep thinking it was magic. 

Once you have finished cooking your broth, you need to strain it. Some blogs call for special straining equipment, but I just use a regular kitchen strainer. A bit of the herbs and pepper may end up in the broth, but I actually like that bit of sediment. I think it adds flavor. I will typically let the strained broth sit in the fridge for a few hours so I can skim off additional fat, but it is perfectly fine to eat immediately. Store the broth in the fridge for up to a week, or frozen in individual portions for a few months.

Enjoying your Bone Broth

If starting your day with a cup of soup doesn’t sound appealing, you aren’t alone. Luckily, broth is a fantastic base, and can be used in a lot of your other recipes. Most of the time, I’ll heat up the broth on the stove top, adding chopped carrots, celery and some leftover chicken for an easy soup. Sometimes I throw in some cauliflower rice as well or sweet potato noodles.

Instant Pot bone broth is also great to add flavor and nutrients to regular recipes. I use it to deglaze pans, make sauce, or poach vegetables and eggs. I also use it to replace wine in some of my recipes, to keep them paleo/ Whole30.  Anything you would typically use regular stock for, you can substitute in bone broth. If the hype is to be believed , it will not only elevate the flavors you would get from a traditional chicken stock, but will basically make you a super hero. 

Instant Pot Bone Broth

Ingredients

  • 2 small bird carcasses (I like using a duck and a chicken combination) along with necks and giblets.
  • 3 large carrots, washed (leave skin on)
  • 3 celery stalks, washed
  • 3 large parsnips, washed (leave skin on)
  • 1 head of garlic (cloves whole, but peeled)
  • 1 large yellow onion, skin removed and quartered
  • 3 turmeric bulbs, washed and cut in halves (or 2 tsp powdered turmeric)
  • 1 inch piece of fresh ginger, peeled and cut into 3 pieces (or 1 tbsp chopped ginger)
  • 20 sprigs fresh parsley
  • 20 sprigs fresh dill
  • 20 sprigs fresh thyme
  • 1 tbsp kosher salt
  • 2 tbsp pepper corns

Instructions

  1. Preheat oven to 450 degrees. Line a roasting pan with tinfoil, and place bones, neck and giblets in a single layer. Roast for 45 minutes, or until a rich golden brown. Check bones regularly to make sure they do not burn.
  2. When the bones have been roasted, place them in the bottom of the instant pot. Add the other soup ingredients to the pot. You may need to cut the carrots, parsnips and celery into smaller pieces so everything fits. Fill the Instant Pot to the "max fill" line with water.
  3. Seal the Instant Pot, and make sure steam valve is closed. Using the manual setting, set the Instant Pot to high pressure for 120 minutes.
  4. When Instant Pot has finished, let the steam release naturally. The best results for the broth come if you let the soup sit overnight in the Instant Pot (while still on) - but it will still be great if you only have 2 hours.
  5. Strain the broth from the mixture of vegetables and bones (which can be discarded). Store the broth in an airtight container in your refrigerator for up to one week, or freeze in individual portions for up to three months.
Schema/Recipe SEO Data Markup by Yummly Rich Recipes
https://www.urbancavewoman.com/recipes/entrees/instant-pot-bone-broth/

Product Review: Instant Pot

Posted on March 14, 2017

It is no secret to my friends and family that I love kitchen gadgets. In my defense, when you cook as much as I do, anything that makes cooking simpler, faster, or somehow more delicious, is always appealing. Unfortunately, living in Manhattan means that I have very limited space to indulge my kitchen-gadget obsession. I have to be ruthless in deciding what “makes the cut” into my pantry, and make sure the tools really are worth the space. My latest object of desire has been the , but is it really worth it? 

For the past six months, every blogger I follow has raved about the  Instant Pot. As tempted as I was to try it, I wasn’t sure if it was worth the hype  (or the space).  Many was the night I’d lie in bed, pining over the Instant Pot, exclaiming to my husband that we absolutely NEEDED this miracle device. He would question if “need” was the right verb, and then remind me of the slow cooker that lives in our closet, and the stand mixer that is permanently on display in our living room. However, when my birthday rolled around, and a brand new Instant Pot appeared at my doorstep, I finally had the opportunity to give it a try and see if it was everything I dreamed it would be.

Getting Started

When I first opened my Instant Pot, I was a bit taken aback by how large it was. It has a smaller footprint than my , but it is several inches taller. Once I had it out of the box, I tried to decipher the instructions. 

Fact #1: The instructions were too long, and didn’t have enough pictures.

Yes, I said it. Pictures. I’m going to be honest here, I hate reading instruction manuals. And I don’t think I’m alone there. Opening the box, and reading the manual, referencing valves and such felt like too much thinking for something that is supposed to simplify my life. While cursing under my breath, I went to my purse to grab my reading glasses. I wish I hadn’t. I didn’t like what I read.

Fact #2: You have to freaking deconstruct this thing before using it!

Now, I understand if a minimal amount of assembly is required for some devices – but I’ve never been given something that needs to be disassembled upon receipt. The instructions for set up involved removing some valve covers (which my pot didn’t have), and the seal, and then replacing everything. They also referenced parts and names as if I was supposed to naturally know what they were. This is where pictures would have really come in handy. Not to be deterred, I did what anyone would do. I went to YouTube to find a video. 

Fact #3: You aren’t supposed to just start using the damn thing.

YouTube is amazing when one is too lazy to read a 20 page manual. However, deconstructing my new toy wasn’t the only thing I needed to do for it to be primed and ready to cook my dinner. No. The Instant Pot apparently needed a practice run with plain old water. For those of you type-A rule followers, you may want to skip the next bit and go straight to the “Cooking with the Instant Pot” section…

At this point, I said f&*k it and just started cooking. I know that there are probably many safety reasons for this long and involved process, but I have zero patience. I wanted to take this baby out for a test drive. If at any point in the future the FDNY has to make a visit to my apartment, I will take full responsibility. But for now, I had dinner to cook.

Cooking with the Instant Pot

Test #1: Frozen Meat in the Instant Pot

Once I decided to not follow the instructions – I started to like my new device much better. In spite of my impatience, the first thing I decided to cook wasn’t for me. It was dinner for my dog, Winnie (don’t judge, I cook for her… and she deserves it). One of the most appealing things about the Instant Pot for me was the fact that it supposedly can cook frozen meat. Yup, you read that correctly. Frozen. 

I typically cook a 3 day supply of food for Winnie at a time, and always have frozen chicken thighs portioned out and ready to go. I threw in a portioned out amount of the frozen thighs (about one pound), added enough water to cover the meat (2 cups in my case), and sealed up the top. According to Hip Pressure Cooking, frozen meat should be cooked for 50% longer than the normal instructions (or 4 minutes longer based on this chart). Being extra cautious, I set my pressure cooker on high for 30 minutes. 

Fact #4: Cook times are misleading, as you have to let the Instant Pot “reach pressure” first (kind of like preheating an oven). This takes even longer with frozen meat.

By this point, I felt very mislead by my magical Instant Pot. For something that has “Instant” in the name, I had assumed this would be a time saver. Sadly, I was already a good hour into this project before my food even started to cook! To be fair, my own bumbling around contributed a lot to this delay. I’d say I spent 20 minutes getting frustrated with instructions, and watching videos before I actually got to cooking. Then another 10 minutes making sure I was programming and sealing it properly. Using frozen meat also really slowed down the process to reach pressure, so the 30 minutes that took would be much faster with defrosted foods. However, I was tired, and this was annoying. 

When the instant pot finally beeped to mark it’s completion, I was ecstatic. So was Winnie, who was pacing the floor at this point waiting to be fed.  The instructions for frozen food indicate that I needed to let the steam release naturally. So I sat back and waited.

Fact #5: Once your food is finished cooking, you still need to let the steam release. This takes time.

The steam release concept was the one I was most confused about. Luckily, the natural method meant I had to do nothing but wait. And wait. Finally, after what felt like an eternity, the digital display let me know I could open the lid. 

Verdict: The chicken was cooked all the way through, and Winnie seemed to enjoy it. I don’t think I’ll use the Instant Pot regularly to make her food, but it will be useful in a pinch, if I’ve forgotten to defrost her chicken in the morning.

Test #2: Slow-Cooker Replacement 

One of the selling points of the instant pot is that it can speed up your classic slow-cooker recipes. The idea of spending an hour or so waiting for food to be done, as opposed to half a day was quite appealing. My husband and I love our slow-cooker, but we don’t use it as often as we would like to since it takes up not only the entire counter, but the better part of a day. It’s hard to think that far ahead for dinner all the time. The Instant Pot not only gives us marginally more counter space to work with when in use, but also allows us to be a bit more spontaneous in our dinner plans. Being able to have a hearty soup or stew in under an hour, versus waiting 10-48 hours? Sign me up!

I adjusted our three favorite slow-cooker recipes to try in the Instant Pot (I’ll share the recipes in a separate post soon):

  • Chicken Soup;
  • Bone Broth; and
  • Short-rib Stew.

Of the three test recipes, the one I was most excited about was the bone broth. If I’m being completely honest, 99% of the reason why I wanted the Instant Pot was because I really wanted to have homemade bone broth without a 48 hour cooking process. On my first try for the bone broth, I forgot to put the Instant Pot on high pressure. At the end of the hour, I had a really good soup, but the bones didn’t look like they had started to get to that soft state, so I cooked it again for another 2 hours. The result was amazing! And I can’t tell you how great it has been to have the bone broth so readily available – I’m using it so much more now that I know it isn’t such a process to make more. 

The chicken soup was also a huge hit. I like to have individual servings of chicken soup in our freezer at all times. I can’t tell you how many times this has saved me! As “luck” would have it, my husband came down with the stomach flu about two days after I got the Instant Pot. Within an hour, he had fresh chicken and veggie soup, that tasted as good as the soup we simmer slowly for 24 hours. 

Fact #6: The pressure cooker will intensify any flavors you put into it – creating a rich and amazing flavor profile you will swear took far more work than it actually did.

The best part about the Instant Pot soup wasn’t just the reduced cooking time, but the incredibly rich and complex flavors it infused. I had only used one sprig each of fresh rosemary and thyme in my stock, but the flavor was perfect. This may have been one of the best batches of soup I’ve ever made. 

Learning from the soup experiment, we finally advanced to cooking a stew. One of our favorite slow-cooker meals is a short-rib stew. I’d seen a recipe on NomNom Paleo for short-ribs, that looked great, but called for some ingredients we can’t eat. I wanted to create something similar by adapting my own slow-cooker short rib recipe for the Instant Pot. 

Fact #7: You need way less liquid than you think you do when using the pressure cooker function.

The end result was a fall-off-the-bone, knock-your-socks-off-flavorful soup-stew. While the flavors were great, and the meat was cooked perfectly, there was a lot more liquid in the Instant Pot than I expected. If you aren’t following actual Instant Pot recipes (and just adjusting slow-cooker ones), you need to play a bit with the liquid proportions. While slow-cookers allow liquid to evaporate and reduce, the pressure cooker keeps it all in there. It also extracts liquid from the ingredients, so even though I only put in 1 cup of liquid to the Instant Pot, I had easily 3-4 cups of liquid in the finished product. Not bad (actually delicious), but just not what I had expected. 

Verdict: Though I am still getting used to adjusting the liquid proportions for my recipes, the Instant Pot gets and A+ from me as a slow-cooker replacement. The quick and easy soups are a major selling point, and already make me regret my initial frustration with the Instant Pot setup. But what really got me hooked was the intense flavor infusion you get with pressure cooking. Even the most subtle of seasonings is amplified in the pressure cooker, and it is what takes this gadget from useful, to indispensable. 

Test #3: Under Pressure, Instant Pot as Pressure Cooker

Though I’d used the Instant Pot pressure cooker feature to make my other recipes, I had only stuck to those items I normally make in a slow cooker. These are typically soups or stews of some kind. I wanted my final test of the Instant Pot to be making a meal that didn’t require a spoon. Since we are a meat-loving family, I focused on cooking protein; one-on-the-bone cut and one off-the-bone cut. 

The first recipe we tried was basic chicken. My husband had been curious about the Instant Pot, and decided that he wanted to do a whole chicken in it for dinner one night. He broke the chicken down, seasoned it, and cooked it in the pressure cooker with onions, a little bit of broth, and a splash of white wine. Oh. My. God. The pictures do not do this meal justice. This may have been the best, most sumptuous, decadent chicken I’ve ever had in my life. And I don’t even like chicken. While much of the credit does go to my husband and his uncanny ability to balance flavors, I do need to pay respect to the Instant Pot here. Wow. There was still a lot of liquid left in the Instant Pot when the chicken was ready, but we thickened that up with some  to make a really delicious gravy. One of the best meals I’ve had at home in ages.

Fact #8: As delicious as the food from the Instant Pot is, the visual presentation leaves something to be desired. Without the searing to give the food a nice caramelization, everything ends up looking rather beige. I’m still working on how to best “finish” the food to make it more visually appealing.

The final recipe test we conducted was on a boneless cut of meat. Since I knew there was no chicken dish I could ever cook that would compare to my husband’s, I opted to try the Instant Pot out with some really nice boneless pork chops. I threw them in with some mustard, onion, fresh herbs, apples, and bacon, and added about 1/4 a cup of bone broth to cook on high pressure for 15 minutes.

Fact #9: Boneless cuts really need much less time to cook than you think, but luckily, even over cooked meat isn’t dry when done in the pressure cooker. 

Unfortunately, I cooked the pork too long. Even though it was only 15 minutes, the meat was definitely over cooked. Luckily, the flavors were really good, and even though I knew the meat was overdone, it wasn’t dry or tough. Lesson learned.

Verdict: I finally see the “time saving” feature everyone was raving about. When cooking meat (that isn’t frozen), the Instant Pot reaches pressure pretty quickly, and can fully cook meat in very little time. The only down side is you really need to know how to cook “under pressure”. Unlike other forms of cooking, you can’t check to see how the food is doing until the pressure cooker is done. I think it will take me a while to get used to assessing the best cook time and pressure for each cut. 

Test #4: Multi-Functional

Of course, I couldn’t do a full review of the Instant Pot without evaluating the 7-in-1 concept that is advertised. The Instant Pot is supposed to be a pressure cooker, slow cooker, rice cooker, steamer, sauté, yogurt maker & warmer. I had tested the pressure and slow cooker functions, and it certainly proved itself on that front. The rest of the features honestly seemed ancillary to me at first. I don’t really eat rice (though I do make it occasionally for Winnie), and I don’t eat dairy (so a yogurt maker seems like a stupid appliance for me to own). However, the steamer, sauté, and warmer features are things that I would use.

The Instant Pot comes with the steamer rack included, so I was tempted to try and steam some broccoli for dinner the other night. When it came time for dinner, I just couldn’t figure out how to make steaming my veggies in the Instant Pot practical. I have very limited counter-space, so basically giving it all up to steam veggies is already inconvenient for me. I admit that I normally just throw my broccoli in a , and microwave it. This takes 1.5-3 minutes (depending on how much I’m cooking). Steaming the same amount of broccoli in the Instant Pot takes 2-4 minutes – and that doesn’t include the time it takes to reach pressure or release the steam. Add to this the fact I then have to clean the pot, the rack (both of which are dishwasher safe), and the lid, and this just didn’t make sense. I gave up. While I know microwaves have their own risk factors, and are probably making my insides glow like Marie Curie, I decided that was still preferable to using the InstantPot for steaming. Maybe I’ll try to use it for artichokes at some point, but for now, this feature is kind of useless to me.

The sauté function, however, is clutch. I wouldn’t endorse using the Instant Pot expressly for the purpose of sautéing food, since a stovetop is much more practical. What I did use it for was prep work for the short-rib stew and the pork I made. I seared the short-ribs in the Instant Pot before using the pressure cooker function, and also used the sauté feature to cook the onions and bacon I was using for the pork. I liked that the inner pot heated up quickly, and had a really good even heat distribution. It met my needs for the recipe, and reduced the number of dishes I needed to do. 

Verdict: In reality, the 7-in-1 concept feels much more like a marketing ploy than anything. If you think about it, an oven could also be a 7-in-1 product. It bakes, sautés, boils, warms, cans, fry’s, and steams too. However, the Instant Pot’s versatility will make it easier to do one-pot meals. My husband also noted that between the Instant Pot and our , we could almost completely eliminate the need for a traditional oven. 

Cleaning Up

I know this may make me seem high maintenance, but I really don’t like having to hand wash things. I suffered through many years of city living without a dishwasher, and now that I have one, I really enjoy using it. One of the things I hated most about the slow-cooker, was that it was such a pain to clean. It had to be hand washed, and was too big to fit in the sink easily. The inner pot of the Instant Pot is actually dishwasher safe, but the lid must be hand washed. To be honest, I actually haven’t put the inner pot into the dishwasher yet. I wouldn’t say that the surface is non-stick, but it is very easy to clean with some soap and a sponge. Unlike the slow cooker, food doesn’t get baked onto the surface as often, so cleaning up by hand has been a total breeze!

Verdict: I actually feel like the meals I made with the Instant Pot required far less clean up than most other nights, even though I hand washed the components. The fact that this can truly assist in making one-pot meals is huge! And not having to “babysit” the food as it cooks, gives me time to clean up my prep area while I wait for my food to be ready. A+.

Summary

My initial frustration with the Instant Pot quickly dissipated once I got comfortable using it. Taking into account everything I’ve experienced working with it the past few weeks, there is a lot in favor for the Instant Pot, but I’m not sure if it is the miracle product everyone makes it out to be, or if it is worth it for everyone.

Downside:

  • Although smaller than most slow-cookers, this isn’t a small device. If you have limited kitchen storage, you will need to seriously consider if this is something you will get enough use out of to make the purchase worthwhile. 
  • Not as “multi-purpose” as it markets itself to be.  I honestly don’t know how many people are actually going to use the yogurt making function. I know they are out there, I’m just saying it won’t benefit 99% of the people who buy this. It primarily is a pressure cooker, with the added benefit of being able to sauté. You can use the sauté function to boil water, and use it as a traditional slow cooker, but saying that it is 7-in-1 feels somewhat misleading.
  • Not completely intuitive at first. Granted, I took it out of its box to play with following a long day at work, and with a very hungry puppy waiting for her dinner. If I actually sat down and read the instructions when I was a bit more refreshed, and less distracted, I may have felt differently. However the entire initial set up process seemed like over-kill, and would completely intimidate some people. 
  • You need to be okay trying and failing. Unless you grew up using a pressure cooker, this will be a new experience for you. It takes time to get the hang of how a pressure cooker works, and figuring out how to adjust your recipes for this method of cooking. If you aren’t okay with some trial and error (or are a huge fan of soup), this may not be for you. 

Upside:

  • Makes soups (especially bone broth) in a fraction of the time. If you like to make soups, stews, or broth, this will save you a ton of time. 
  • Flavor Intensity like you have never known. I am not being hyperbolic here – the ability to get intense and rich flavors with only a small amount of herbs and spices is unbelievable. A small amount of aromatics will add a richness and depth to your food that is normally really difficult to achieve for home chefs. Not only are my fresh herbs lasting me longer (since I use less of them), but I’ve actually enjoyed the flavor so much more! 
  • Really lives up to the one-pot meal hype. Even my beloved sous vide requires more than one item to be cleaned at the end of the meal, but this is really capable of doing an entire dish in one pot. 
  • Actually can cook meat from frozen. As much as I complained about the time it took, this is a pretty cool feature. I cook for Winnie 2-3 times a week, and I forget more often than I like to defrost her chicken. While it isn’t “instant”, I now know that I can go from frozen to cooked in an hour. Huge plus.
  • Low-stress dinner prep. One of the reasons I love my sous vide, is because it gives me time to unwind at night when I get home, and still have dinner ready at a reasonable hour. The Instant Pot does this as well. Once everything is prepped and in the pot – you just have to wait. 

Taking all the good and the bad, the Instant Pot comes out a winning tool for me. I don’t think that I will use it every day, but it will certainly get used multiple times a week. Though we got off to a rocky start, I have the feeling that this is the beginning of a beautiful friendship. 

Shopping List:


Back to top