


“It has good bones…”
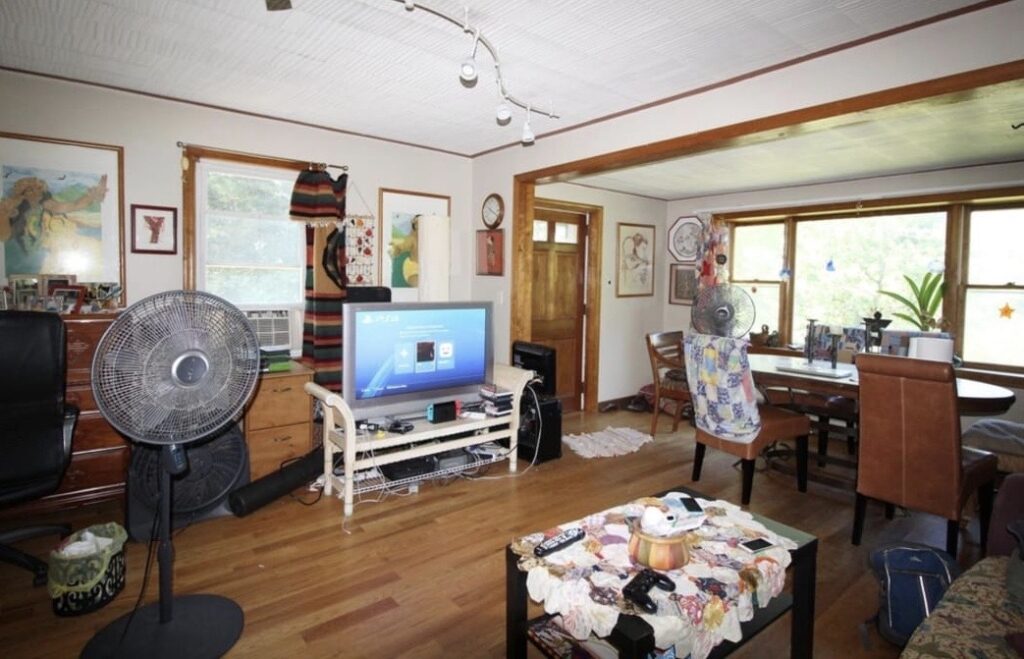
There are two types of people in this world. The kind who think “it has good bones” is a polite way of saying your place is a $h!thole, and those who are excited by the potential. We fall into the latter group. Half the fun of moving for me is the creativity that comes when trying to polish that diamond in the rough, and really make a challenging space feel like home.
Rental Decorating Challenges
To be fair to those who fall into the former category, decorating in a rental is tricky! Besides the investment of both time and money it can take to really bring a space up to its full potential – you need to make sure your landlord is on board with what you want to do. On that front, we REALLY lucked out. Our landlord was fine with us painting and swapping out fixtures. His only request was that if we took something out (like a fixture or appliance) it stayed when we left. Other than major construction, he was happy for us to make any improvements to the unit that we wanted.
Making a Home
We knew that we were going to be living in this unit for at least two years (most likely more). This was going to be the first home Amelia would remember. All her first major milestones would happen and be recorded here. For that reason alone, we were more willing to put the time and money into making this our home. A few items we needed to address ASAP. The rest would happen over time, as life and budget allowed.
We decided to make a project plan and budget, prioritizing the rooms we would use the most, and the changes that would give us the most function before really focusing on the aesthetics. The room we knew we would be in the most was the living room. It was also the room that (thankfully) needed the least amount of work to get done.
The Plan
- Replace lighting ($100): This was the first thing we tackled in the room. The original light fixture was an industrial track light, that was so hot, it was actually burning the ceiling. Not only was this an eye-sore, but we were worried it was a safety hazard. We put it on the top of the list. Attractive fixtures can be outrageously expensive. The fixture will be staying after we leave, so we didn’t want to spend more than $100.
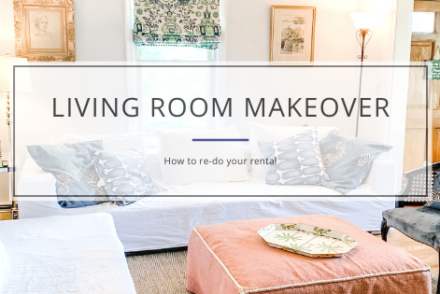
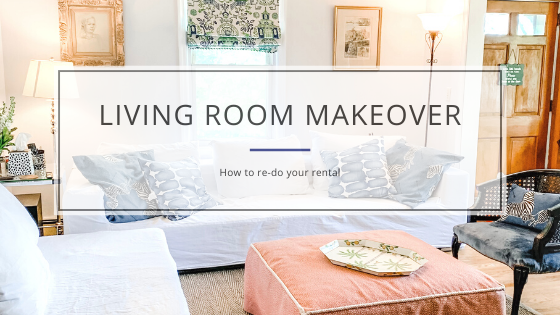
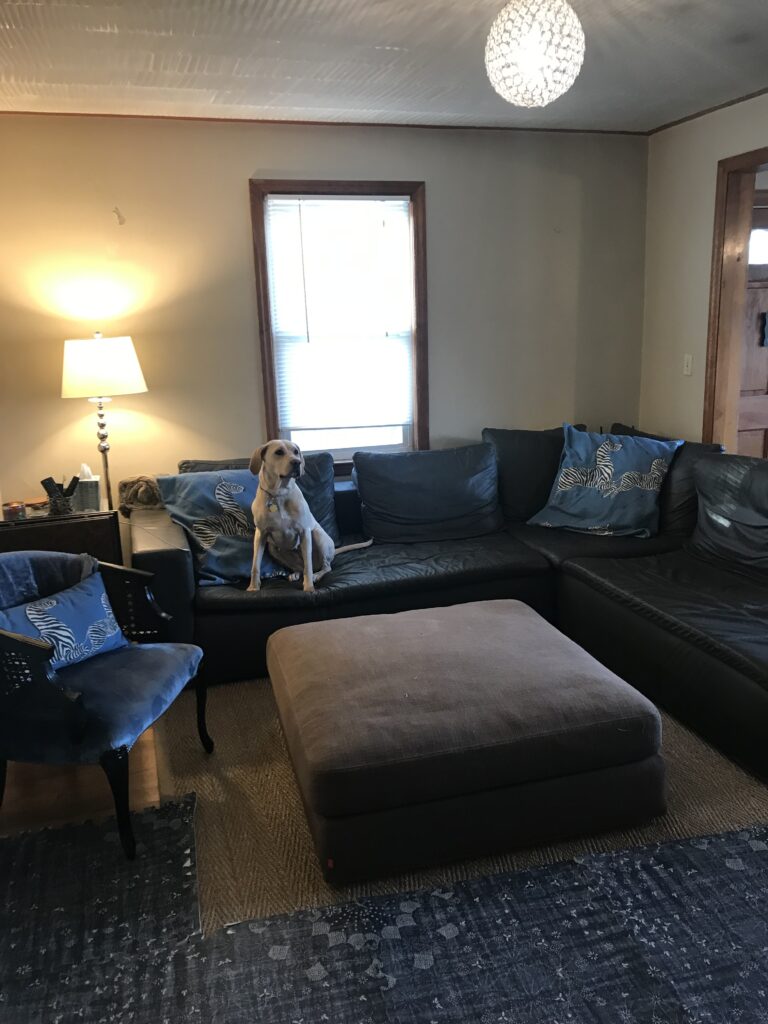
- Slipcover the furniture ($150): An odd choice, but it actually had some logic behind it. Andrew and I didn’t have budget for new furniture. Since this isn’t our forever home, it would be silly to buy furniture for a temporary space. I am a little handy with my sewing machine, so making some slipcovers seemed like a good solution. They give our couch a great facelift, and help protect the leather.
- Prime and Paint ($250): Painting was going to (by far) be the most expensive portion of our projects. We measured our room to be 20′ x 20′. As the layout is fairly open plan, we really only had 2.5 walls that needed primer and paint. We estimated we would need 4-6 gallons of the pricy zero VOC paint. With the heavy price tag and man hours required, this was one of the last items on our list. Andrew was traveling a lot, and I was working full time in the city and commuting. We had to wait for a long weekend or vacation to get this done.
- Window Dressing ($40): One of the things I hate more than anything, are horizontal blinds. They are unattractive, ineffective, flimsy, and the hallmark of every rental. However, in the grand scheme of the projects we needed to do, this was definitely at the bottom. Once everything was done, I was going to DIY like a pinterest pro, and make those hideous horizontal blinds into a thing of beauty.
Total Estimated Budget for the Living Room: $540.00
The Reality
Lighting
The first item on our list, the ceiling light, was by far the easiest and cheapest step in our plan. We decided to do a crystal mini-pendant in the living room for a whopping $79. The crystals refracted nicely, and really amplified the light from a single bulb.
Step 1: Under Budget!!! -$21
Slipcovers
A leather couch may have seemed like a good idea to my husband when he was a bachelor; but it is not practical for a family. Besides the logistics of protecting and cleaning the leather – it was also just too dark for the space. After talking to a few friends with kids, we decided to go for a durable white bull denim. Yes, white seems like a brave choice, but it ended up being the best option for a few reasons. It was the cheapest fabric, as well as heavy duty, and durable. The thick fabric would protect the leather underneath from dog nails, and to hold up to many washings. White would also be easier to clean than a color. Bleach. A moms best friend.
The Couch
I waited to buy the fabric until there was a good deal, and am glad I did. The fabric is normally $9.99 / yard. I waited until Hobby Lobby was offering 4% cash back through Rakuten. This was then combined with their sitewide promotion of 40% off one item at regular price. I needed 15 yards of the fabric, which came out to $5.99/ yard (after the 40% coupon). My order qualified for free shipping, so after tax, the total was $95.56. Factoring in the $3.60 cash back I got from Rakuten, my total cost ended up being $91.96!
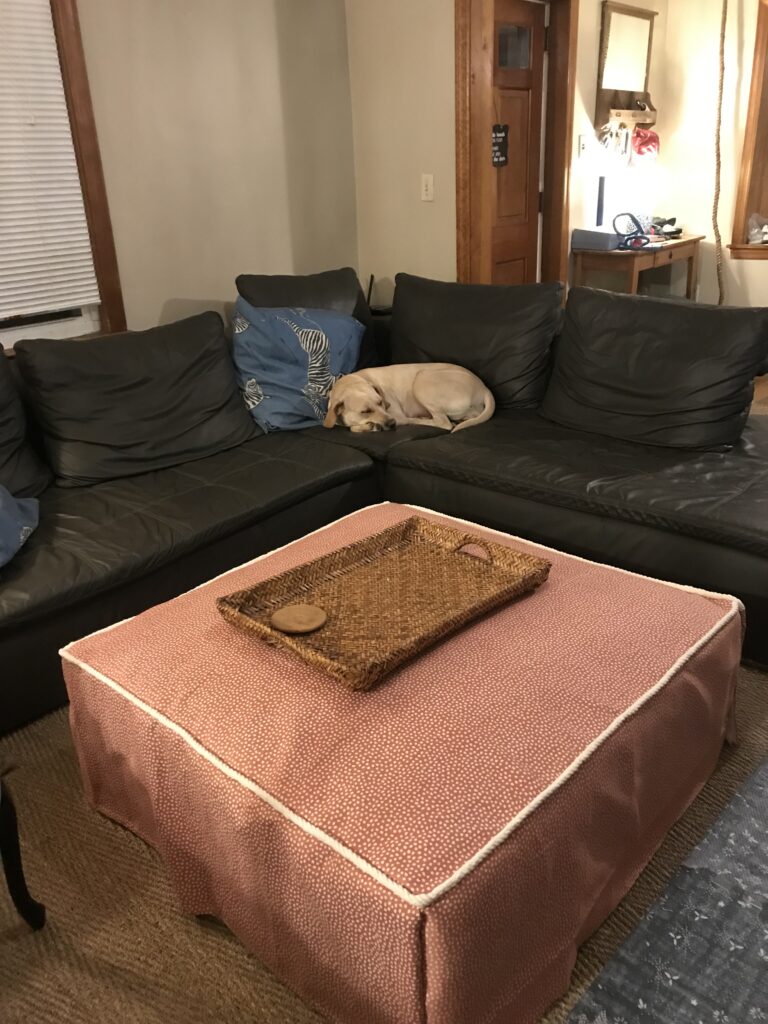
The Ottoman
The next item in the room to be slipcovered was our giant ottoman. This was another piece of oversized, dark furniture from my husband’s bachelor days. Literally being the “center of the room”, it needed a major facelift. I knew that with the white couch, and sisal rug – the room needed a pop of color as well. I only needed 3 yards, and lucked out in finding a GREAT 4 yard remnant on Fabric Guru for $16.
All told, once I bought thread, and trim, I spent $121.96 on the living room slipcovers.
Step 2: Under Budget!!! -$28.04
Painting
Painting was a labor of love. By my husband. Not me. I know he will hold it over my head for the rest of our lives together; but he was an absolute super star when it came to painting the entire apartment on his own. I swear I had every intention of helping out! But every time I went to grab a roller, Amelia would wake up from her nap. How is that my fault?
In addition to being the biggest pain in the a$$, painting was also the most expensive portion. Our walls just SUCKED up the paint. We ended up needed to do 4 coats! I also really underestimated how many rollers and paint trays we would go through. All told, we ended up spending $300 just on paint and supplies in the living room alone!
As much as I hated the expense, getting rid of the dark taupe and maroon was the BEST feeling. The room instantly felt bigger, cleaner and brighter. Will the next 40-60 years of my life be spent hearing “remember the time I had to paint an entire apartment by myself…”? Yes. But it is totally worth it.
Step 3: Over Budget +50
Window Treatments
The final phase of our living room re-do was my pinterest project: making horizontal blinds into roman shades. I’ll go into greater detail on the DIY in another post. For now, I’m just going to focus on what a huge impact window dressings can have on a room.
This is possibly one of the easiest things any renter can do to immediately change a room. You may not be able to paint, or update fixtures, but anyone can install their own curtains or blinds.
I had been coveting an amazing Pagoda Toile pattern I found on pinterest. It was exactly what I wanted, but insanely expensive ($24/ yard). The design god’s must have taken pity on my plight. By some miracle I found a 13 yard remnant for $23! This was more than enough for the roman blind in the living room and matching curtains in our dining room. I spent another $17 on supplies, but had enough left over for other windows.
Step 4: On Budget
The Results
We are so happy with our new living room! The entire process took us about 6 months, but it was well worth it. All told, we only went $0.96 over budget, so I’m calling that a win.
There are still several naysayers, who wonder why we spent so much on an apartment we ultimately will leave. For us it was well worth the investment. I still get giddy looking around our home, and am so proud of what we did. Even though we aren’t home owners yet, our apartment feel grown up, and like a true reflection of our family.